As the year began, I committed to starting this new project and maintaining a blog to record its progress. However, it quickly dawned on me that diverting my attention to this new endeavor would hinder the completion of another significant project—the first phase of developing my basement. To ensure its completion, I had to prioritize it above all else. Temporarily setting aside this project, I dedicated my attention to the development of the basement, engaging in tasks like framing, wiring, drywalling, sanding, and various other endeavors. Finally, the initial phase of my basement development is now finished, allowing me to shift some of my time back to the Massfaction development project.


We can once again focus on configuring and launching our Kubernetes cluster on the digital ocean infrastructure.
In This post we’ll look at the process of containerizing our application, followed by pushing our container image to a container registry. Finally, we’ll uncover the secrets of deploying our application to our Kubernetes cluster and serving it securely to users on internet reviewing the required manifests and applying them to our cluster.
From Code to Container: Generating a Docker Image of the Application
Kubernetes, being a container orchestration platform, requires the utilization of images. Therefore, prior to deploying an application to our Kubernetes cluster, the initial step entails generating a Docker image for our application. In order to accomplish this, a Dockerfile is required. While we won’t delve into the details of creating a Dockerfile here you can find documentation related to the required contents of a Dockerfile https://docs.docker.com/engine/reference/builder/ .
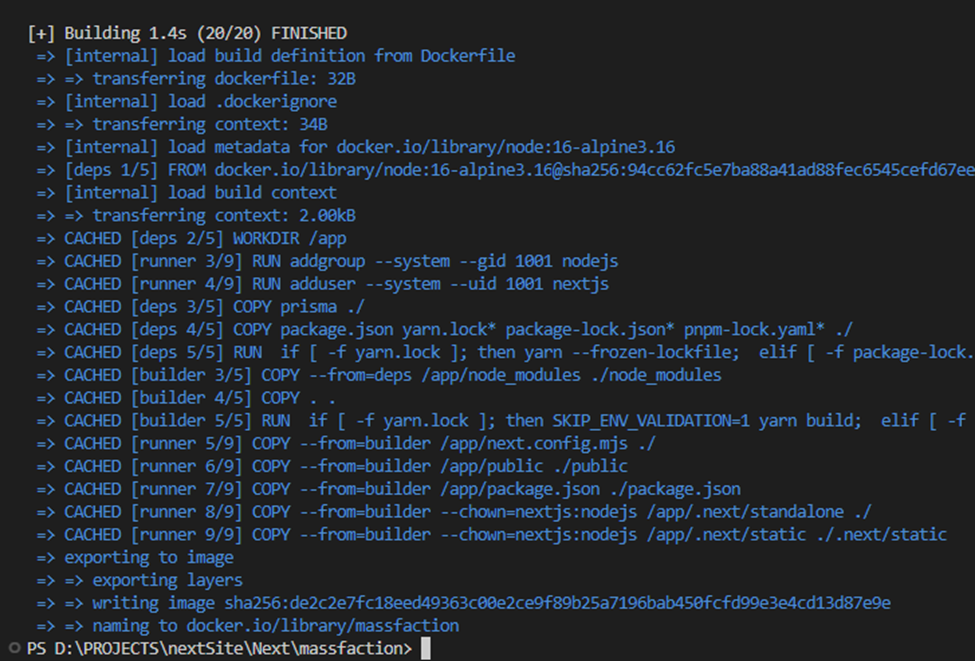
In order to construct the Docker image, it is necessary to open a terminal and navigate to the root directory of the application where the Dockerfile is located. The command to be employed for Docker image creation is the “build” command, complemented by the “-t” option which enables the assignment of a specific name to the Docker image.

In the above command, we assign the name “massfaction” to the image. Additionally, we need to specify the path to the Dockerfile, which is indicated at the end of the command using “.” to signify the current directory. Upon executing the command, the build process will commence, and Docker will provide real-time updates on the build status, notifying you upon completion.
Reaching New Heights: Pushing the Image to the Container Registry
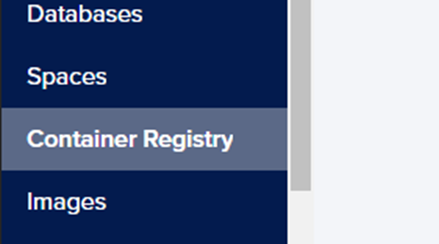
Having successfully created the Docker image for our application, the next step involves pushing the image to a container registry. A container registry serves as a repository for storing images, and there exist numerous options for container registries. For our purposes, we will employ the container registry provided by DigitalOcean. To access the DigitalOcean Container Registry, navigate to the DigitalOcean Cloud Dashboard and locate the “Container Registry” option in the menu.
The initial step entails creating a container registry, and DigitalOcean provides a free option for the container registry with a storage capacity of 500 MB. To create a container registry, specify a name for the registry, choose the appropriate subscription plan, and proceed by clicking on the “Create Registry” button.
In order to access the registry, it is necessary to log in using the doctl command-line tool. However, prior to doing so, you must generate an API token and utilize it to grant doctl access to your DigitalOcean account. Detailed instructions on installing and configuring doctl can be found at the following resource: https://docs.digitalocean.com/reference/doctl/how-to/install/.
Once you have successfully configured doctl, you will gain the ability to log in to the container registry. To accomplish this, employ the doctl CLI with the command “doctl registry login”.

Prior to pushing the image to your container registry, it is essential to tag the image with the DigitalOcean registry. To achieve this, employ the following Docker command: docker tag massfaction registry.digitalocean.com/registryname/massfaction:v0.1
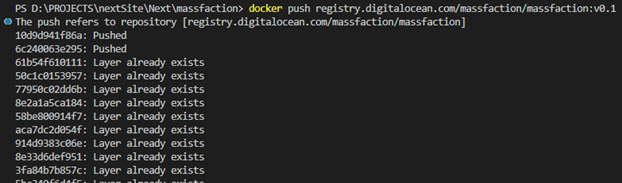
Once we have tagged the image we can push the image to the DigitalOcean container registry using the following Docker command:docker push registry.digitalocean.com/registryname/massfaction:v0.1
The status of the push to the registry will output to the terminal.
Mapping Your Online Path: Setting Your Domain Name Serve
To proceed, it is necessary to acquire a domain from a domain provider. Once you have obtained a domain, the subsequent step involves configuring the name servers to point to DigitalOcean’s name servers: ns1.digitalocean.com, ns2.digitalocean.com, and ns3.digitalocean.com. It is important to note that the specific process for updating name servers varies across different domain registrars. To obtain detailed instructions on how to configure name servers for various common domain registrars, refer to the following resource: https://docs.digitalocean.com/tutorials/dns-registrars/.
Claiming Your Online Territory: Adding Your Domain to the DigitalOcean Networking Dashboard
After successfully configuring your domain to utilize the DigitalOcean name servers, you can proceed to add the domain within the Networking dashboard. This can be accomplished by accessing the “Domains” tab within the Networking dashboard.
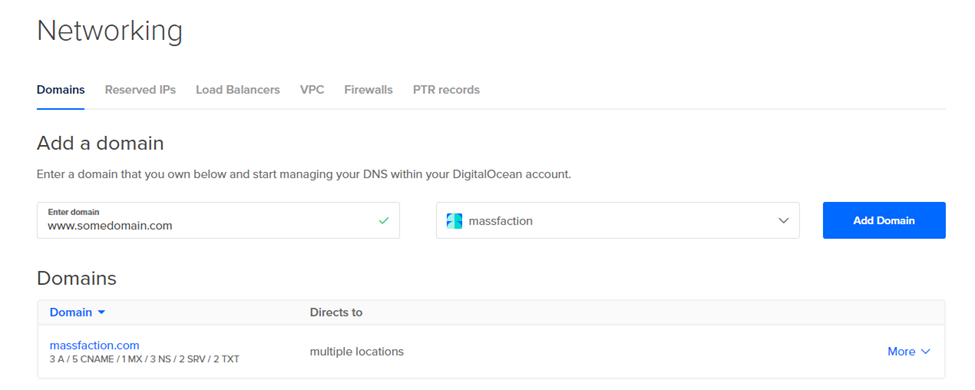
Upon successfully adding the domain, you can proceed by clicking on its name to access the DNS records management interface. we will need to modify the A records for “massfaction.com” and “www.massfaction.com” (or the respective records for your domain). Update the value of these A records to reflect the IP address of the load balancer associated with your Kubernetes cluster.


Conquering the Kubernetes Realm: Deploying Your Application to the Cluster
Having obtained an application image, successfully pushed it to a container registry, and configured the domain name, we have reached the stage where we can deploy the application to our Kubernetes cluster. To accomplish this, a few manifests are required to ensure secure serving of the application to users on the internet. The four manifests that need to be applied to our cluster are as follows: deployment, service, issuer, and ingress manifests.
Deployment Manifest
The deployment manifest describes a Deployment resource that can be used to manage the deployment of containerized applications in the Kubernetes cluster.
Here are the contents of the deployment manifest:
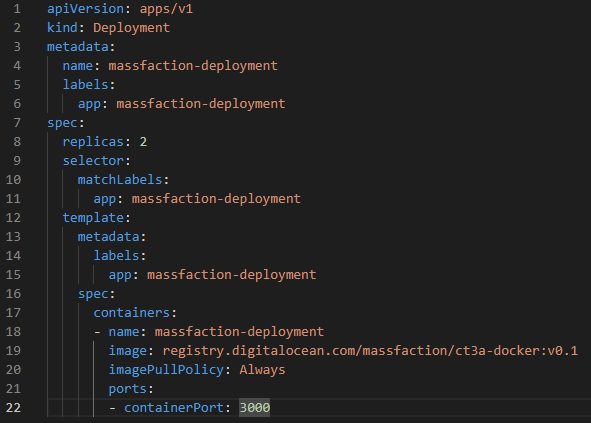
Here are some details describing the contents of the deployment manifest:
- apiVersion: apps/v1: Specifies the Kubernetes API version to use for this resource.
- kind: Deployment: Indicates that this is a Deployment resource.
- metadata: Contains metadata information about the Deployment.
- name: massfaction-deployment: Specifies the name of the Deployment.
- labels: Provides labels for identifying and grouping the Deployment.
- spec: Describes the desired state of the Deployment.
- replicas: 2: Specifies that the Deployment should have two replicas (instances) of the application.
- selector: Defines the label selector used to determine which Pods the Deployment manages.
- matchLabels: Specifies the labels used for selecting the Pods.
- app: massfaction-deployment: Specifies the label and value to match Pods with.
- template: Defines the Pod template used for creating new Pods.
- metadata: Contains metadata for the Pods created from this template.
- labels: Provides labels for the Pods.
- app: massfaction-deployment: Specifies the label and value for the Pods.
- spec: Describes the specification for the Pods created from this template.
- containers: Specifies the containers to run in the Pods.
- name: massfaction-deployment: Sets the name of the container.
- image: registry.digitalocean.com/massfaction/ct3a-docker:v0.1: Specifies the Docker image to use for the container.
- imagePullPolicy: Always: Configures the container to always pull the latest image.
- ports: Specifies the ports to expose on the container.
- containerPort: 3000: Sets the container port to 3000.
Service Manifest
The Service manifest defines a Service resource named “massfaction-service”. It selects Pods with the label app: massfaction-deployment and forwards incoming traffic on port 80 to the Pods’ port 3000. The Service acts as a stable endpoint for accessing the Pods that are managed by the Deployment described in the deployment manifest.
Here are the contents of the service manifest:
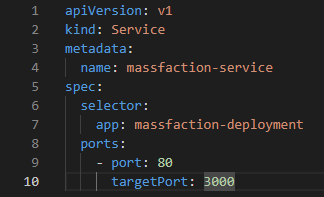
Here is some details describing the contents of the service manifest:
- apiVersion: v1: Specifies the Kubernetes API version to use for this resource.
- kind: Service: Indicates that this is a Service resource.
- metadata: Contains metadata information about the Service.
- name: massfaction-service: Specifies the name of the Service.
- spec: Describes the desired state of the Service.
- selector: Defines the label selector used to determine which Pods the Service should target.
- app: massfaction-deployment: Specifies the label and value to match Pods with. This selector ensures that the Service targets Pods with the label app: massfaction-deployment.
- ports: Specifies the ports that the Service should listen on and forward traffic to the target Pods.
- port: 80: Sets the port number that the Service listens on.
- targetPort: 3000: Specifies the port number that the Service should forward traffic to on the target Pods.
Issuer Manifest
The Issuer manifest configures cert-manager to manage Let’s Encrypt certificates. It specifies the ACME server, the email address associated with the ACME account, and the private key stored in a Kubernetes Secret. It also sets up the HTTP-01 challenge solver using the Nginx ingress controller. This configuration enables automatic provisioning and renewal of Let’s Encrypt certificates for services running in the Kubernetes cluster.
Here are the contents of the issuer manifest:
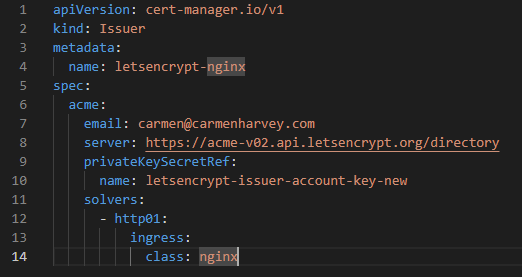
Here are some details describing the contents of the issuer manifest:
- apiVersion: cert-manager.io/v1: Specifies the Kubernetes API version for the Issuer resource.
- kind: Issuer: Indicates that this is an Issuer resource.
- metadata: Contains metadata information about the Issuer.
- name: letsencrypt-nginx: Specifies the name of the Issuer.
- spec: Describes the desired state of the Issuer.
- acme: Specifies the configuration for the Automatic Certificate Management Environment (ACME) protocol, which is used by Let’s Encrypt.
- email: carmen@carmenharvey.com: Sets the email address associated with the ACME account. This email is used for notifications and account recovery.
- server: https://acme-v02.api.letsencrypt.org/directory: Specifies the ACME server URL that should be used for certificate issuance and management. In this case, it points to the Let’s Encrypt ACME server.
- privateKeySecretRef: Specifies the reference to the Kubernetes Secret that contains the private key for the ACME account.
- name: letsencrypt-issuer-account-key-new: Specifies the name of the Kubernetes Secret that contains the private key. The private key is used to authenticate with the ACME server.
- solvers: Configures the method to solve the ACME challenges and obtain certificates. In this case, the HTTP-01 challenge solver is used.
- – http01: Specifies the HTTP-01 challenge solver.
- ingress: Configures the ingress-related settings for the HTTP-01 challenge solver.
- class: nginx: Specifies the ingress class to use for the HTTP-01 challenge solver. In this case, the Nginx ingress controller class is used.
Ingress Manifest
The Ingress manifest defines routing rules for external HTTP traffic to the massfaction-service Kubernetes Service. It configures TLS termination for the hostnames www.massfaction.com and massfaction.com using the certificates obtained from the letsencrypt-nginx Issuer. The Ingress uses the Nginx ingress class to handle the routing.
Here are the contents of the Ingress manifest:
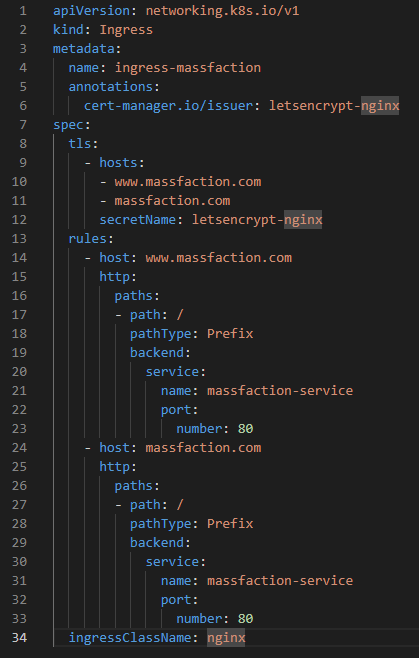
Here are some details describing the contents of the ingress manifest:
- apiVersion: networking.k8s.io/v1: Specifies the Kubernetes API version for the Ingress resource.
- kind: Ingress: Indicates that this is an Ingress resource.
- metadata: Contains metadata information about the Ingress.
- name: ingress-massfaction: Specifies the name of the Ingress.
- annotations: Provides additional configuration or metadata for the Ingress.
- cert-manager.io/issuer: letsencrypt-nginx: Specifies the cert-manager Issuer to use for obtaining TLS certificates. In this case, the issuer named “letsencrypt-nginx” will be used to obtain the certificates.
- spec: Describes the desired state of the Ingress.
- tls: Configures the TLS settings for the Ingress.
- hosts: Specifies the list of hostnames for which TLS certificates should be obtained.
- www.massfaction.com
- massfaction.com
- secretName: letsencrypt-nginx: Specifies the name of the Kubernetes Secret where the TLS certificate will be stored. In this case, the certificate obtained from the “letsencrypt-nginx” Issuer will be stored in this Secret.
- rules: Specifies the routing rules for the Ingress.
- – host: www.massfaction.com: Sets the hostname for the rule.
- http: Specifies that the rule handles HTTP traffic.
- paths: Specifies the paths to match for this rule.
- – path: /: Sets the path that should be matched. In this case, it matches all paths.
- pathType: Prefix: Specifies the type of matching for the path. In this case, it uses a prefix match.
- backend: Specifies the backend service to forward the traffic to.
- service: Specifies the service to forward the traffic to.
- name: massfaction-service: Specifies the name of the Kubernetes Service that should receive the traffic.
- port: number: 80: Specifies the port number of the Service that should receive the traffic.
- – host: massfaction.com: Sets the hostname for the rule.
- http: Specifies that the rule handles HTTP traffic.
- paths: Specifies the paths to match for this rule (similar to the previous rule).
- – path: /: Sets the path that should be matched.
- pathType: Prefix: Specifies the type of matching for the path.
- backend: Specifies the backend service to forward the traffic to (similar to the previous rule).
Manifest Magic: Applying the Manifests to Our Cluster
At last, we can proceed with applying the manifest to our cluster. Initially, we will apply the deployment and service manifests by utilizing the “kubectl apply” command. open a terminal and navigate to the directory containing the manifests.
Run: kubectl apply -f deployment.yaml
kebectl will respond letting you know the deployment was created.
Run: kubectl apply -f service.yaml
kebectl will respond letting you know the service was created.
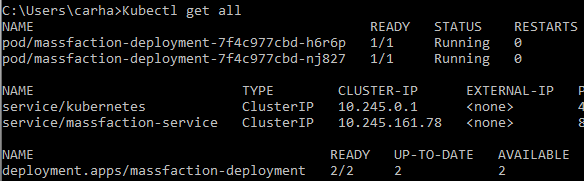
Once the deployment and service have been applied to the cluster, you can execute the “kubectl get all” command to observe the status and obtain detailed information about the deployment and service. It is important to note that the Cluster IP associated with the service represents a stable IP address.
Now we will apply our issuer and ingress manifests.
Run: kubectl apply -f Issuer.yaml
Run: kubectl apply -f Ingress.yaml
kebectl will respond letting you know the issuer and ingress was created.
The Ingress resource in the provided manifest utilizes the specified Issuer (letsencrypt-nginx) to request and obtain TLS certificates for the specified domain (www.massfaction.com and massfaction.com).
The cert-manager.io/issuer annotation within the Ingress metadata section specifies the Issuer to be used for managing the certificates. In this case, the letsencrypt-nginx Issuer is referenced. This association allows cert-manager, the certificate management tool, to interact with Let’s Encrypt (the configured issuer) and automate the certificate issuance process.
By linking the Ingress resource with the Issuer, cert-manager automatically handles the certificate provisioning and renewal workflow, ensuring that valid and up-to-date TLS certificates are obtained and associated with the specified domain for secure communication over HTTPS.
To check the status of the certificate order in a Kubernetes cluster using cert-manager, you can use the following commands:
To list all the Certificates in the cluster: kubectl get certificates
To check the status of the Certificate’s Order: kubectl get orders
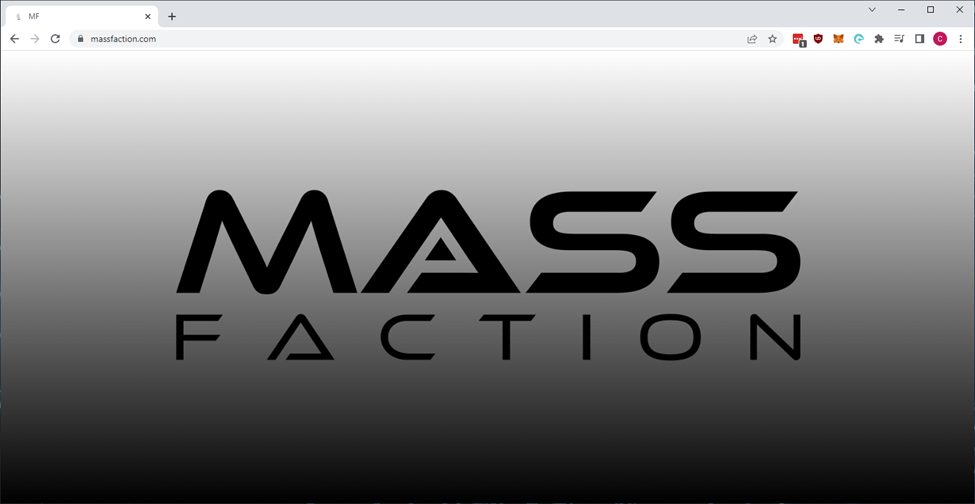
Having successfully applied the manifests to our cluster, our website is now securely accessible on the internet using the host names specified in the ingress manifest!
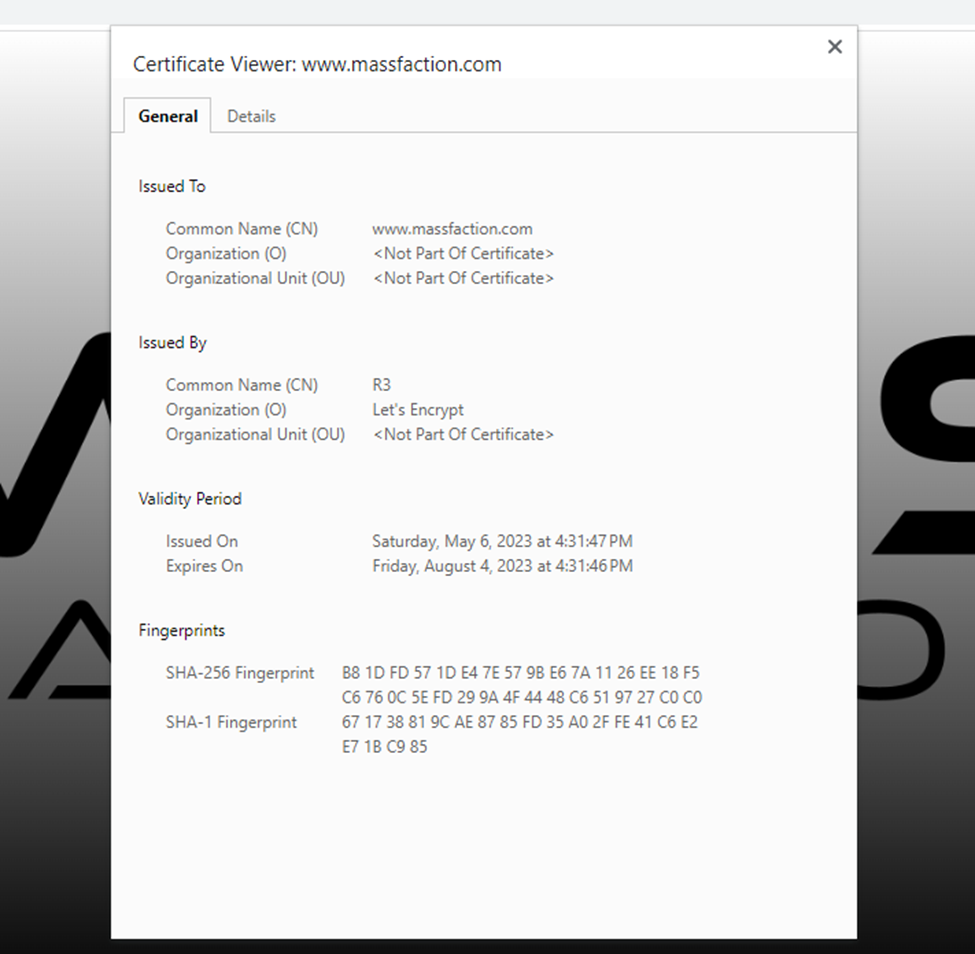
To view the details of the certificate issued by Let’s Encrypt for our site, click on the lock icon adjacent to the domain name in the address bar.
Continuing the Journey: Exploring the Next Steps
In the upcoming post, we will delve into the exciting world of what we are developing and hosting at massfaction.com. Not only will we explore the technical aspects of the project’s development, but we will also dive into other fascinating details. This includes delving into the creation of a captivating design system for the project and devising strategies to attract users to the site through the power of social media.
Leave a Reply